Thursday, February 08, 2024
My comics about free/open source project
I have been posting comics about free/open source software for several years, originally written in Korean. Following numerous requests from my colleagues to translate them into English, I've published several episodes on Medium and shared the link here. :-)
Wednesday, August 29, 2018
The WindowService2(?) of CrOS
Recently, WS was replaced with WS2:
What is the Window Service of ChromeOS? Window Service is a kind of Window Compositor like Weston. It is a separate process from the browser process in CrOS. Some of CrOS features are part of the browser process, but those features will be a separate process using the WindowService.
For more details, see https://cs.chromium.org/chromium/src/services/ws/README.md
- 1144255 window-service: removes mus_demo, test_wm, and some unnecessary deps
- Issue 865689 Remove window-service
What is the Window Service of ChromeOS? Window Service is a kind of Window Compositor like Weston. It is a separate process from the browser process in CrOS. Some of CrOS features are part of the browser process, but those features will be a separate process using the WindowService.
For more details, see https://cs.chromium.org/chromium/src/services/ws/README.md
"Clients establish a connection to the WindowService by configuring Aura with a mode of MUS. See aura::Env::Mode for details. The WindowService provides a way for one client to embed another client in a specific window (application composition). Embedding establishes a connection to a new client and provides the embedded client with a window to use. See the mojom for more details. For example, on Chrome OS, Ash uses the WindowService to enable separate processes, such as the tap_visualizer, to connect to the WindowService. The tap_visualizer is a client of the WindowService. The tap_visualizer uses the WindowService to create and manage windows, receive events, and ultimately draw to the screen (using Viz). This is mostly seamless to the tap_visualizer. The tap_visualizer configures Views to use Mus, which results in Views and Aura, using the WindowService."CrOS is now becoming more like a regular desktop. I'm not sure this is a good decision.
Linux container for ChromeOS
Recently, ChromeOS started to support Linux applications on ChomeOS. Google hasn't allowed ChromeOS to run native applications due to security reason. Finally, they found a way to support Linux application through the container technology.
It is worth to read a discussion on CrOSVM on Hacker News because the original author joined the discussion. Here is the article about ChromeOS Linux container.
https://www.zdnet.com/article/chrome-os-could-be-getting-containers-for-running-linux-vms/
There is a Youtube video:
https://www.youtube.com/watch?v=s9mrR2tqVbQ
Here is the readme about CrOSVM.
https://chromium.googlesource.com/chromiumos/platform/crosvm/+/837b59f2d97b005ef84ac36efa97530c1bbf2a79/README.md
The interesting thing is that it is implemented with Rust. Google now seriously uses Rust of their product, which is a good news for the Rust community.
Thursday, July 12, 2018
Making Use Of Chrome's Ozone-GBM Intel Graphics Support On The Linux Desktop
Recently, I published a blog article about making Use Of Chrome's Ozone-GBM Intel Graphics Support On The Linux Desktop. This is about using ChromeOS graphics stack for a regular Linux system. This article was also mentioned in Phoronix.
Originally, my old colleague started working on this a long time ago, but it has been broken since then. So I have been trying to enable ozone-gbm on a Linux system because this solution would be useful for embedded systems. I'm making a Yocto recipe for this and will open it soon.
Originally, my old colleague started working on this a long time ago, but it has been broken since then. So I have been trying to enable ozone-gbm on a Linux system because this solution would be useful for embedded systems. I'm making a Yocto recipe for this and will open it soon.
Thursday, May 24, 2018
Rust & DRM
I was surprised that there are many low-level graphics projects written in Rust and I started looking into one of them: drm-rs. Then, I added an example for handling page-flip event.
drm-rs is a subproject of Smithay that is a wayland compositor written in Rust. It allows Rust applications to access the Direct Rendering Manger(DRM), a subsystem of the Linux Kernel. So, we could directly paint something into a frame buffer and render it on the display using DRM APIs.
drm-rs is a subproject of Smithay that is a wayland compositor written in Rust. It allows Rust applications to access the Direct Rendering Manger(DRM), a subsystem of the Linux Kernel. So, we could directly paint something into a frame buffer and render it on the display using DRM APIs.
Friday, May 04, 2018
BlinkOn9
I attended BlinkOn9 from April 18 to 19, 2019. Here is the official page: bit.ly/blinkon9-info, presentations, and Lightning Talks.
At this conference, I talked about acelerating graphics performance with ozone-gbm on Intel based Linux desktop systems: explained what kind of hardware accelerations have been applied to Intel -based Chromebook and how we can use them on a Linux desktop.
Here is a demo video on Youtube:
At this conference, I talked about acelerating graphics performance with ozone-gbm on Intel based Linux desktop systems: explained what kind of hardware accelerations have been applied to Intel -based Chromebook and how we can use them on a Linux desktop.
Here is a demo video on Youtube:
Wednesday, September 27, 2017
Setting up NFS in OpenStep
If your server or host PC supports NFS, you can set up shared directories for OpenStep. For example, if the shared folder is nfs://192.168.1.19/nfs/ftp, you can add the imported directory in NFSManager.app as follows:

Run mount command in OpenStep to mount a remote directory as follows:

Run mount command in OpenStep to mount a remote directory as follows:
$ mount -t 192.168.8.16:/mnt/openstep /coreonionReference
Wednesday, September 20, 2017
Installing OpenStep 4.2 on Parallels
NextStep is one of the advanced operating systems in 90s. You may understand why it is by watching this video:
Every features Steve Jobs introduced in this video was possible in 1992, which is amazing. So I've dreamed of using NextStep since I was aware of it, but I've never seen a running demo and just saw a NexTCube. By chance, I found instructions how to install OpenStep 4.2 on Parallels. Finally, NexStep(OpenStep4.2) started running on my machine. o/

If you want to run OpenStep 4.2, follow this instruction. The only problem is that network doesn't work so it needs to install a network driver. I found the solution by googling, but the link of NE2000 disk image(http://www-teaching.physics.ox.ac.uk/NextStep/NE2K_driver.fdd) was broken. Fortunately, I was able to recover the link from https://archive.org/ so you can download it.
Network setting:
1) Install the NE2K driver;
2) Shut down. Under Boot Order, make sure the hard drive is the first device, and add "devices.net.force_adapter_type=rtl"; in the boot flags.
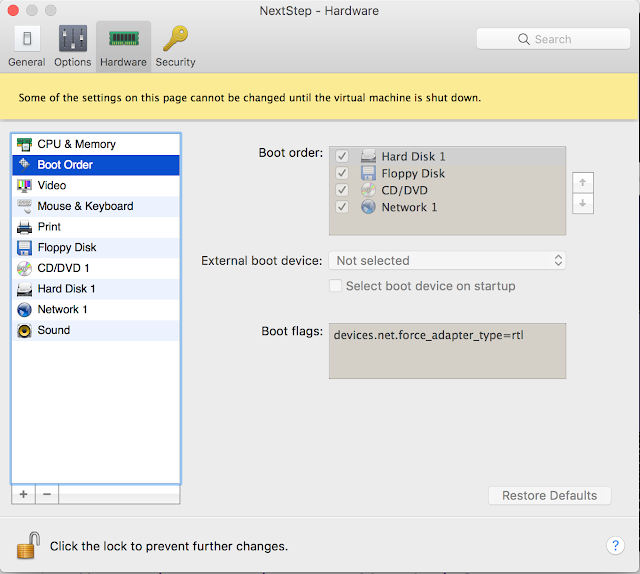
3) Set the shared network. Reboot.
5) Open HostManager.app. Under Local choose "use local domain only".

6) Assigned one of available IPs in your local network. Let the machine Reboot;
7) Add a name server in /etc/resolv.conf
Installing developer tools: there is a good video on Youtube:
The next step is to write some Objective-C code with this book and download some applications from http://www.nextcomputers.org/NeXTfiles/
References:
- http://openstep.bfx.re/
- http://www.nextcomputers.org/docs/FAQ-OpenStepOnEmulators.pdf
- https://forum.parallels.com/threads/openstep-4-2-driver-thread.3408/
- http://www.nextcomputers.org/forums/viewtopic.php?t=2992
- https://forum.parallels.com/threads/older-nic-emulation-before-gigabit.110324/
Subscribe to:
Posts (Atom)